Write: Storyboarding to Avoid the Sagging Middle #ReadySetWrite
 So . . . I was going to do another recap post of previous writing/craft topics, but since this series has now stretched into a third month (and there’s still lots I want to cover), I’ll just post links and let you peruse at your leisure:
So, now let’s move forward into one of my favorite topics when talking about writing—the visual aspect. As with most of the rest of the aspects of writing, there are just about as many different ways to do this as there are writers. For me, there are actually two steps to how I storyboard.
Storyboarding Part 1: Character Casting
 The first is Character Casting and collecting images of the Real World Templates for my characters expressing as many different types of emotions as I can find images of or that speak to me and help me in building the character. This is something I spend a lot of time doing in the Get Ready and Get Set steps of preparing a story.
But when I get into the middle of writing and I’m starting to lose steam or feel stuck, I’ll either spend some more time reviewing the images I’ve already found (saved in OneNote or PowerPoint or pinned to a dedicated board on Pinterest), or I’ll search out more images (or movies or TV shows featuring the templates I’ve chosen, since I almost solely use actors) in order to see if I can find inspiration for new scenes or new aspects of the characters that can infuse me with motivation to get back to writing the story.
Storyboarding Part 2: Scene Cards
If you followed all of the steps in the Get Ready and Get Set parts of this series, you saw where I recommend not only writing out detailed backstories for the characters (and the world), you’ve worked out your overall premise, and you’ve worked out your Seven Story Beats and have either a rough outline or a full synopsis.
All but two of my eleven published novels were sold based on synopses and proposals, and those synopses varied from detailed to somewhat vague. But once I started writing, I got caught up in the minutia of the characters and the dialogue and the setting and sometimes lost sight of where the story was supposed to be going—and forgetting some of the scenes I’d had ideas for when I first wrote the synopsis. Which usually brings my momentum to a screeching halt and means it can be days or even weeks on end without producing meaningful word count.
So that’s when I knew it was time to stop and break out the Post-it Notes:


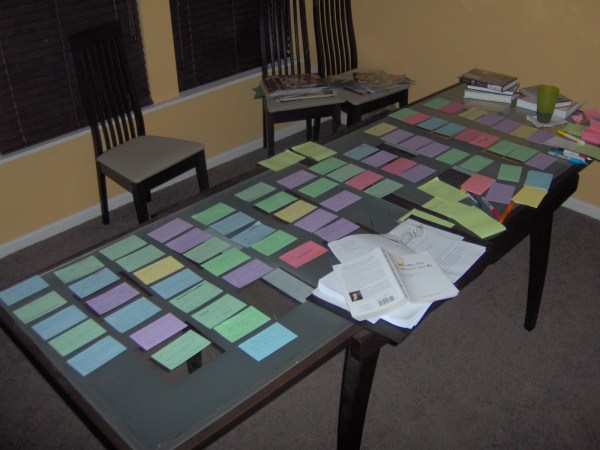
Here are two examples from two different books (and two different rooms!) of how I did my scene cards. They’re color-coded by POV character. In the upper (light wall) image, the stickies in the top section represented the scenes/chapters I’d already written—I’d gone through and re-read my entire manuscript and wrote a one- or two-sentence summary of it. As I was doing that, I was sometimes reminded of follow-up/consequence scenes I needed to write spawned by what was already there. I also went through and re-read the synopsis and wrote out scene cards for the scenes I’d already plotted there. So those are the stickies in the bottom section of the top image.
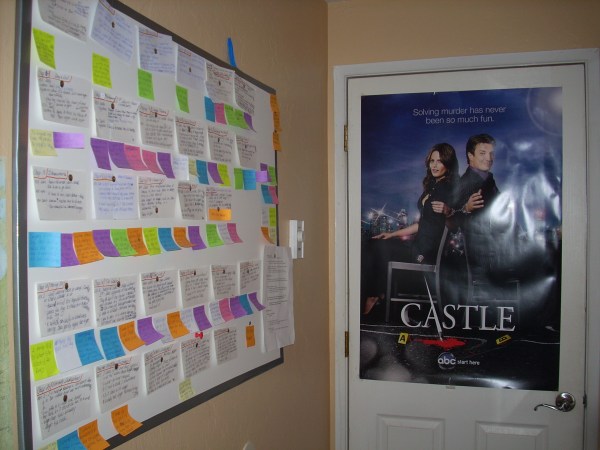
In the lower (dark wall) image, I did the same first step—going through and re-reading what I’d already written and writing out cards for each scene. The below that, you can see hanging (lowest) on the wall, a page from the Post-it Flip Chart that has my seven-beat outline written out on it, with synopses of what happens in each step. Then, on the page still attached to the flip chart, I was making notes of scenes that I wanted or needed to write. And, interspersed throughout on the smaller Post-its, both with the scene cards and with the character images, are notes on ideas or backstory or tidbits I was thinking about incorporating in the story.
With later books, when I was spending less time working at home and needed my storyboarding more portable, I went back to a previous (old, old) method using PowerPoint:
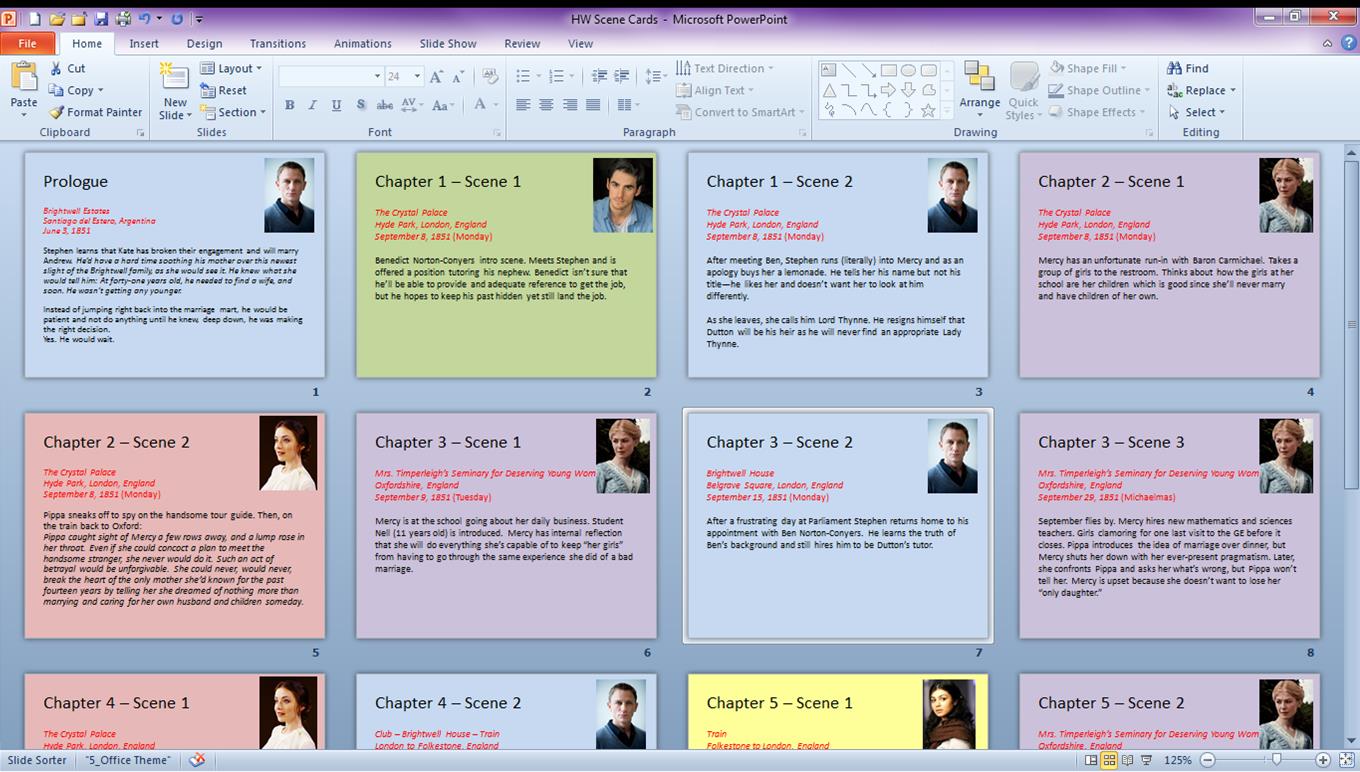
As if color-coding the “cards” by POV character weren’t enough, in PPT, I can include an image of the character, just in case I forget which color is which character. Each “card” includes the setting (red text) and a summary of what happens in that scene.
What products or software can I use?
Obviously, you don’t have to have any software to do this—it can be completely manual if you prefer. Just make it creative. Make it fun. Make it work for you.
Here are some examples I found around the web of how other authors do it. (Inclusion here does not constitute endorsement of these authors or their books on my part—I just thought their methods were interesting and I wanted to give credit where credit is due.) Click on the image to go to that author’s website/blog to find out more info about his or her methodology.
Color-coded Index Cards by KM Smith
.
Index Cards & Sticky Notes by Christi Corbett
.

Excel/Spreadsheet by Ken McConnell
.

Word Table from H. D. Dodson (site no longer exists)
.

Write It Now 4 software by Pamela Hegarty
.
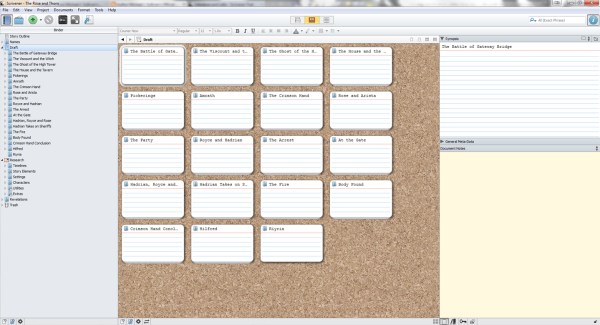
Scrivener software by Michael J. Sullivan
.


Trackbacks
Comments are closed.