SCENE IT! Visualizing Your Story One Scene at a Time (Scene Cards)
I’ve talked about this many times, both in workshops and here on the blog, but it’s always worth repeating. Think about adding the use of scene cards and/or storyboarding to your writer’s toolbox. Play around until you find a method that works for you, then use it—both as you’re writing your first draft and as you’re in the revision process. There are different uses for scene cards and storyboards in both processes, and I want to focus more on scene cards in this post.
What are scene cards?
Scene “cards” are a method of breaking your story down scene by scene in a manner that is both visual and adaptable. They can be anything from Post-it Notes or index cards to PowerPoint Slides or virtual Index Cards in writing software. The form isn’t as important as the function. I suggest going with what’s easiest/most comfortable for you. You don’t have to invest in/learn new software to do this (though if you’re like me and you have fun playing with software, you might find something that works better than a currently comfortable method). Use materials/software at hand and organize them in a way that makes most sense to YOU.
Using scene cards while writing the FIRST DRAFT
In the past four or five years, when I’ve sat down to start writing a novel, I’m doing so from a slightly more advanced stage of story planning than I used to do—because the books I’m writing are those I sold off of long synopses. And while the synopsis for a given story will give the full plot and some key scenes, it doesn’t contain everything—not always even the specifics of the opening scenes.
So when I get about 10k to 20k into the story (or past the character introductions/inciting incident), I usually founder a bit. That’s when I pull out my handy-dandy colored Post-it Notes.

I color-code my scene cards by viewpoint character and arrange them by chapter. In the above example, there are two groupings: those in the top group represent what was already written (in my first draft of Ransome’s Crossing—yes, this is an old photo that has been featured here many times) and those in the bottom group representing scenes I knew I needed based on what I’d written (sequel/consequence scenes) and those already planned, pulled from the synopsis.
When I was working from home and doing most of my writing there, this method worked quite well for me—because all I had to do was turn my desk chair around and look over those cards to refresh my memory of what to write next or what scene/conflict I needed to build toward.
Once I started working outside the house again (first part-time, now full-time), I tend not to write at home as much—I bring my laptop to work or meet writing friends elsewhere after work or on the weekends. Or, sometimes, I may go to Panera or another coffee shop to write on my own. So, I tried sticking with the Post-it Note system but making it virtual:

But . . . that was a program I had to remember to start up, and my 14-inch laptop screen will only hold so many. It was a good way to keep track of/make note of ideas that sprung up while writing, but, then, what if I switched over to the desktop computer once I was home?
With the current WIP (The Heart That Waits) I decided to go back to a method I haven’t used since Ransome’s Honor: PowerPoint Scene Cards:
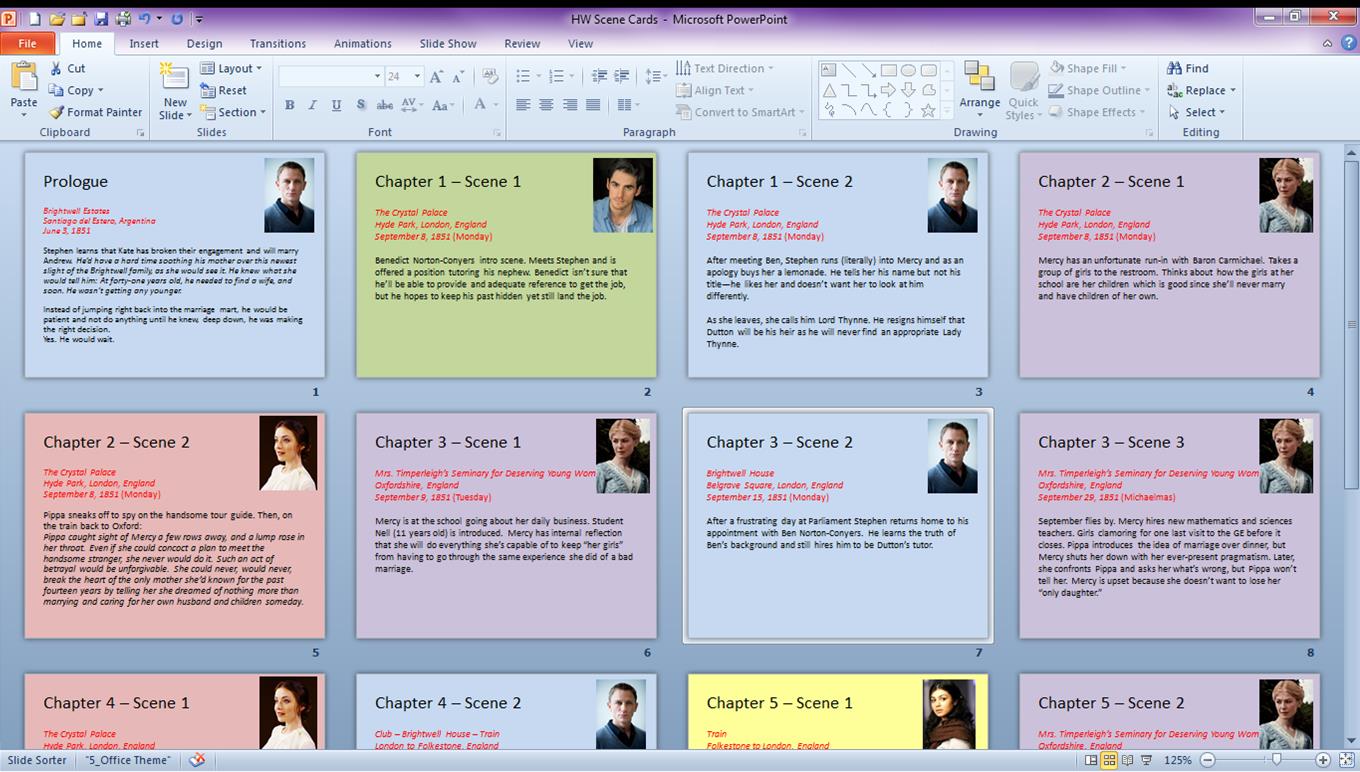
As if color-coding the “cards” by POV character weren’t enough, in PPT, I can include an image of the character, just in case I forget which color is which character. Each “card” includes the setting (red text) and a summary of what happens in that scene.
Using scene cards in the REVISION process
One of the great advantages of scene cards while writing is that it helps you figure out if each scene moves the story forward, has all the elements it needs, and ends with something that will keep the reader turning pages. It also gives you a thumbnail glimpse (sometimes literally!) of what you’ve already written so that you don’t repeat scenes and so that you remember to follow up with sequels/consequences. Color-coding by POV character lets you see if you have a good balance of viewpoints from your main characters—and to make sure that you aren’t getting stuck into a repetitive pattern of his POV, her POV; his POV, her POV; his POV, her POV; his POV, her POV; his POV, her POV; his POV, her POV…
When using scene cards in the revision process, you can also notate how you begin each scene: action, introspection, dialogue, setting, etc. This can help you revise so that you’re not beginning too many successive scenes the same way. Same thing with the way you end them. Scene cards can really help you add variety to your structure and narrative.
You can also determine if the scenes are in the order in which they need to be to give your story the best punch it can have. This is why having a highly adaptable method of scene-carding is best—because it makes it easier to play with the order/structure of your scenes.
What products or software can I use?
While I mentioned that you don’t have to invest in new software (or learning it if you have it) and that there are physical products you can use, I want to make sure that you understand there are as many ways of doing this as there are writers. Make it creative. Make it fun. Make it work for you.
Here are some examples I found around the web of how other authors do it. (Inclusion here does not constitute endorsement of these authors or their books on my part—I just thought their methods were interesting and I wanted to give credit where credit is due.) Click on the image to go to that author’s website/blog to find out more info about his or her methodology.

Color-coded Index Cards by KM Smith
.

Index Cards & Sticky Notes by Christi Corbett
.

Excel/Spreadsheet by Ken McConnell
.

Word Table from H. D. Dodson
.

Write It Now 4 software by Pamela Hegarty
.
Scrivener software by Michael J. Sullivan
.
Do you scene-card? What method do you use? What affects has this process had on your writing in your FIRST DRAFT? In the REVISION process?
I’d love it if you’d share a link to an image of your method!
Trackbacks
Comments are closed.


Wow, great ideas! Normally, I just write short chapter summaries to keep me on track, but I may have to switch it up and see if I like scene cards better.
LikeLike
I usually use a chapter sheet from a template I made in WORD. I think for my next book I’ll try it with Scrivener.
LikeLike
Thanks so much for featuring my picture, and the link back to my blog! I’m loving this post of everyone’s different scene card methods.
Christi Corbett
LikeLike